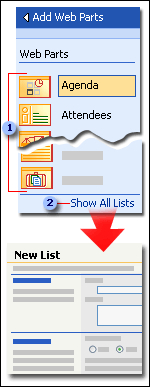
The way you add Web Parts and their associated lists or libraries depends on the following:
The easiest way to add the Web Parts that are commonly used for a Meeting Workspace is from the Add Web Parts task pane. When you use the Add Web Parts task pane, it automatically creates the associated list or library for you using default settings, such as Title and Description. If you add the same type of Web Part to the page again, another list or library is automatically created for it.
If you want the list or library created with a specific name, description, or other property setting, or if you want to create other types of lists that aren't in the task pane, such as a custom list, Events list, or list of announcements, you can create the list by specifying the settings to use. The Show All Lists link at the bottom of the Add Web Parts task pane makes this quick and easy. Once you create the list, its Web Part is automatically added to the current page in the workspace site.
Note This differs from other SharePoint sites where you have to create the list first, and then add the Web Part.
You can also get Web Parts for existing lists or other features by browsing libraries for the current location, parent Web site, or external locations.

1 Drag Web Parts to the page to use default settings. Or …
2 … select lists, libraries, and other features from the Show All Lists link to specify custom settings.
For general information about customizing Web Parts in Windows SharePoint Services sites, see the Help index.