You can connect Web Parts together by passing data, such as a row or filter, from one Web Part to change the display of the other Web Part's data. By connecting Web Parts, you can synchronize their behavior and manage data in dynamic and interesting ways. Traditionally, the chore of connecting sets of data from different data sources has not been easy and has often required programming skills. But with Web Parts, making data connections is as simple as using menu commands. By connecting Web Parts, you can, for example, present data from two Web Parts in alternate views, perform related calculations between two Web Parts, and filter a Web Part using values from another Web Part — all on one Web Part Page.
 What are Web Part connections?
Using Web Part connections, you can create or enhance your Web Part Pages. Typically, you connect Web Parts together so that when you perform an action in one Web Part, it changes the contents of another Web Part.
For example, you can connect an Employees List View Web Part to the Image Web Part by passing data to it. Each time you select a row in the Employees List View Web Part that contains a column with a picture of that employee, you can see the picture displayed in the Image Web Part.
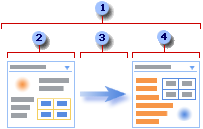
1 A Web Part connection is a way to pass data from one Web Part to another Web Part and synchronize their behavior.
2 One Web Part provides the data.
3 Data can be lists, rows, cells, or parameter values.
4 The other Web Part gets the data.
You can make the Web Part connection from either Web Part by using the connection type submenu from the Connections command on the Web Part menu. For example, if one Web Part's connection type submenu command says Provide Row To, the other Web Part's connection type submenu command says Get Row From.
Not only can you make Web Part connections on the same Web Part Page, but you can also make connections between Web Parts on two different Web Part Pages in the same top-level site by using a Microsoft Windows SharePoint Services—compatible HTML editor, such as Microsoft Office FrontPage 2003.
The basic steps to creating Web Part connections
Creating a Web Part Page with Web Part connections is a simple, three-step process:
Step 1: Decide what data you want available on the Web Part Page
Often, there are one or more List View Web Parts that provide the data you want. Lists present your data in a tabular format and make it easy to modify and refresh data, change the sort order, filter within the list, and aggregate data. By using the view selector in the tool pane, you can easily change the view of a List Web Part, to work with just the columns you need.
In some cases, the data you want is in an application data source external to your site. There are several approaches you can take to make this external data source available. You could request your site administrator to install a Web Part that is designed to use external data sources, such as the Microsoft Office PivotView Web Part, available from Microsoft Office Web Parts and Components. Alternatively, a Web Part developer could develop a customized Web Part that uses an external data source and that can also connect to other Web Parts.
Step 2: Add the Web Parts to the Web Part Page
Most lists are available as List View Web Parts in your site Web Part gallery, and there are usually a variety of additional Web Parts available from all the Web Part galleries you have access to. Sometimes, you may need to import a Web Part from a user at another site who has created an interesting or useful instance of a Web Part. Occasionally, you may want to search for Web Parts on external Web sites, such as the SharePoint Portal Server Web Component Directory or from another software manufacturer, and then request that they be installed on your Web site by your site administrator. Over time, your Web Part galleries will grow and adapt to your needs and the needs of your enterprise.
Step 3: Connect the Web Parts to get the results you want
You can only make connections between Web Parts that support Web Part connections. The Connections submenu on the Web Part menu displays only the type of connection you can make, and the available Web Parts submenu displays only compatible Web Parts. Once you have done steps one and two, decision-making is very simple and no knowledge of scripting or coding is required to make the Web Part connection.
The basic building blocks of Web Part Connections
There are many ways to combine and connect Web Parts on a Web Part Page. Typically, you will make several of these Web Part connections on your Web Part Page. The following scenarios describe common types of data connections between Web Parts. Think of these scenarios as basic building blocks for Web Part connections.
You have a master list of data and you need to display detailed information related to this master list.
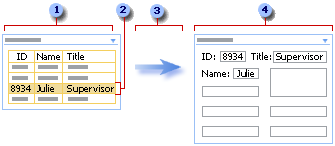
1 An Employee Basics Web Part contains basic, commonly—accessed employee data, such as ID, name, and job title.
2 To look up employee details, you select a row.
3 The row is passed to the other Web Part.
4 In the Employee Details Web Part, all the employee details are displayed in a form view.
In a List View Web Part, you can even sort and filter a large list to help find the employee before selecting the row. If the detail data is extensive, you could even display the Detail Employee Web Part on another Web Part Page.
You have a summary list of data and you need to display the detailed information that produces the summary data.
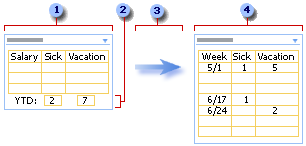
1 A Year-to-Date Pay Stub Web Part contains your compensation information.
2 You select the the summary information about your accumulated vacation time and sick days.
3 The summary information is passed to the other Web Part.
4 In the Pay Stub Details Web Part that displays weekly data, you verify the weeks you recorded those days to refresh your memory or confirm their accuracy.
You display a list of data (the parent) and for each row there is one or more related rows (the children) you want to display in another list.
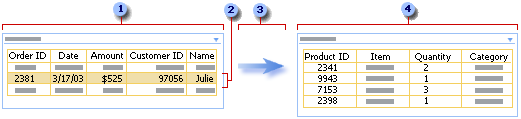
1 An Orders Web Part provides a list of the most recent customer orders.
2 You click the row containing the order you want to examine.
3 The row is passed to the other Web Part.
4 In the Order Details Web Part, all the line items for that order are displayed.
You want to enter data, such as search or filter criteria, in one Web Part to display results in another Web Part.
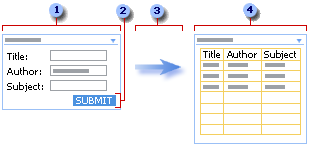
1 In the Book Search Web Part, you enter book information, such as title, author, and subject, to try to find the book or set of books.
2 You click SUBMIT.
3 The search criteria is passed to the other Web Part.
4 The Book List Web Part displays one or more books that match your search criteria.
Although you can often calculate data inside a Web Part, sometimes you may want to combine two Web Parts to make your calculations more flexible.
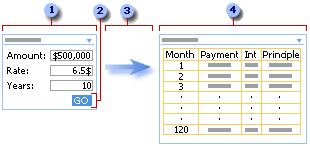
1 You enter mortgage numbers into a Mortgage Numbers Web Part.
2 You click GO.
3 The mortgage numbers are passed to the other Web Part.
4 The Mortgage Calculator Web Part computes the mortgage and displays the monthly payment schedule.
Viewing your data in several different ways can help you to understand implications, trends, and relationships. You can pass lists, rows, and cells (or fields and parameters) from one Web Part and display the data in an alternate view.
You want to display all company employees in a hierarchy chart.
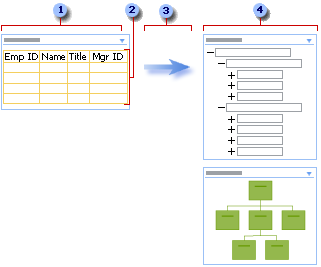
1 The Employees Web Part displays the employee ID, employee name, job title, and manager ID of everyone who works for your company.
2 Because you are using all the data, no selection is required.
3 All the data is passed to another Web Part.
4 The Organization Chart Web Part displays the working relationships between employees and can display alternate views of this hierarchy.
You want to view a row of demographic data in a chart, such as a pie chart or bar graph.
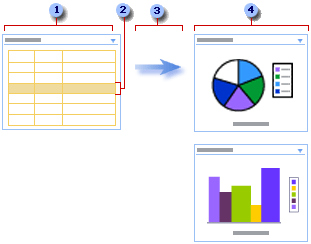
1 A Population Statistics Web Part displays demographic data such as age, income, and heritage.
2 You select a row of demographic data.
3 You pass the data to another Web Part.
4 The Chart Web Part displays the row of data in a pie chart and alternatively a bar graph.
You want to track the overall progress of a fund-raising drive.
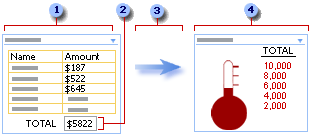
1 In a Fund-Raising Web Part, each member of a group enters the amount of money they have raised.
2 The current total is displayed in a total field.
3 The total field is passed to the other Web Part.
4 You check your group's overall progress in the Charity Goal Web Part.
You want to augment basic data about people and places to make it more interesting, appealing, and useful.

1 A Contacts Web Part displays information you need to keep track of business associates, such as name, address, and perhaps a photo.
2 You select a contact.
3 A row of data is passed to the other Web Part.
4 You see a photo of the contact displayed in the Image Web Part and locate their business address in a Map Web Part.
 Show All
 Hide All